Saturday, December 28, 2013

DSP Snowflakes

Hey, Folks!!

If your craft room is anything like mine, you probably have a stack of designer series paper sitting there that is just BEGGING for you to use it in cards/pages/projects, and there comes a point when you know that there is NO way you're every going to get thru and use all of it--but you still wind up buying more!!  It's just a never ending cycle!!

Before Christmas I was doing some web browsing and came across a really cool paper snowflake pattern that is the PERFECT stash-buster for some of those papers. All you need to make it is six (6) squares of paper--all the same size.  Now, the smallest one I've played with is the one I'm showing here--using 4" squares, but if you have 12" paper, you certainly could made GIANT snowflakes as well.  And once you have the basics down, you can adjust/adapt as you go along!! 

Supplies Needed:
1) Designer Paper (I use double-sided paper)
2) Paper Snips/Scissors
3) Pencil
4) Square of computer/copy paper cut to size
5) Ruler
6) Glue Gun (if you're working with small kids, you may want to use Multipurpose Liquid Glue, with paper clips to hold each piece shut while it dries, but the Glue Gun will work faster!!)
7) Ribbon or Cording (for hanging)

I've played around with a couple different sizes to start with, and really, I like using 4" squares to make the snowflakes that I've been doing.  You could use a whole 12" sheet, and could really go down as small as you'd like (though the smaller you go, the more challenging it will be to work with!!).  The only limit really is your imagination once you get going!!

To start with, I take the square of copy paper and fold it in half, forming a triangle.  On the two 'straight' edges (NOT the folded side), I measure in 3/8", 3/4", 1 1/8" & 1 1/2".  You'll also notice in the photo that I made little 'hash' marks about 1/8" back from the point where the first three points meet.  When you go to cut your squares, you'll want to stop cutting at that point and not cut 'thru' to the corner.  The inner most square is cut away, which is why there are no hash marks on that one.


Now, you'll have six squares cut to 4", and fold all of them the same way as you did the copy paper.  I fold the copy paper around the outside of the folded designer paper and use that as my template (you could also mark each piece individually, but I tend to get impatient, so like to take this shortcut as I'm working!!) and then cut along each line (thru all the layers) on all of the pieces!
So far so good, right?!  Next, you'll want to unfold each square, and using the pencil (or any sort of small cylindrical object you have nearby), roll the center square around it to add some 'curve' to the paper.  I found that I really only need to do this on the center most square--the rest manipulate fairly easy as I go along!
Now it's time to start assembling each 'branch' of the snowflake.   I let the glue gun heat up as I'm working on some of the earlier steps, and it's usually ready to go by now!!  So, I pick up the snowflake and place glue on one point, and bring the point from the other side over to it and hold it for about 5 seconds and allow to dry/cool.
It's a little hard to see, but then I'll take the next square out and 'push' it back/away from the completed piece I just did, and then glue that point on the opposite side.
Again, doing the same thing for the next square--'pushing' it thru the center to wrap around the first post that I had made.
And finally, doing the same with the final square, which will complete one petal/branch.  If you were looking for a simple ornament, you could even stop here and add a simple hanger and they'd be SUPER cute!!
For the snowflake, you'll have to repeat the above steps five more times to complete six petals of the snowflake.  Lay them out so that they're all 'facing' the same direction (in this case, light to the left, and dark to the right).
When you assemble, you want to be sure that you're not flipping any of the pieces around, which is why laying them out is important!  You'll start by gluing the center tip of THREE of the pieces together.
Then, come back and also glue the center of the left branch to the one next to it (to hold the snowflake together).
Create two halves, each with three petals.
Next step is to attach the petals to one another. I actually put them together a little past the first cut--I think the overall look of the snowflake is better that way, but again, it's really up to you!!
And don't forget to attach the center pieces with glue as well!

Now, all that's left is to add a ribbon and hang it up!!

And there you have it!!  A fun way to use up some of that great paper you have laying around!!

Happy Stamping!!

Pam


Friday, December 20, 2013

Stocking Stuffer Bookmarks

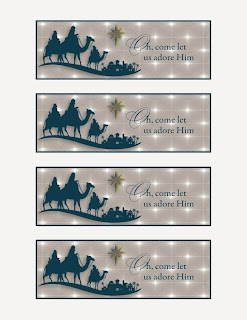
Happy Holidays!!  If your house is anything like mine, it's been a busy/crazy December getting ready for Christmas!!  I'm going to be attending the Children's Christmas Program at Church this coming Sunday, and realized on Tuesday night that I didn't have anything to put in the treat bags!!  Well, My Digital Studio (MDS) to the rescue!!  I have a super cute (and you can own it, too!) download that I got called 'Book Buddies Designer Template' (132814) which served as my initial inspiration. (And as a side note, each of the elements on the bookmarks shown can be used on embellishments on cards/scrapbook pages, etc!)
Now, those bookmarks are TOTALLY adorable, and I easily see myself printing them off to use in the future, but since I am making these for a church program, I wanted something a tad more relevant!!  The template was the perfect backdrop to use to get going.  To start, I created a punch the same size as one of the bookmarks and added a border in Midnight Muse.  Then I placed one of the digital papers from the 'Winter Frost Designer Series Paper Digital Download' (135265).

Then I pulled in the Wisemen image from 'Come to Bethlehem' (123963) and sized it to fit on the punch (also in Midnight Muse) and did the same with the greeting.  A little cropping and a few other minor additions and the design was ready to send off to the Print Center on campus to be printed!
I picked another designer paper from the Winter Frost download to have a pattern on the back  as well.  In the future, I might add an extra Bible verse on the back, but I liked what I came up with for these!!

I had six copies of the page made (24 bookmarks--I need between a dozen & 20, so planned a little extra just to be on the safe side!).  I could have printed them at home easily, but doing multiple pages like this can be a bit of an ink 'hog', so I like to send things off to be printed in cases like this when I have the time to do so!
And cut them apart and hole punched them.  I was debating on how much of a white border (if any) to leave around the images, and went with a scant 1/4".  There's no hard/fast rule there--really it's whatever you prefer!!  LOVE that part of creativity!!
AND I also wanted these to last a while and not get worn out immediately, so I ran them thru the laminator, trimmed them down again, and re-punched a smaller hole.  Again, nothing to say it HAS to be in this order, but I figure a smaller punched hole will add a little stability/durability to the bookmarks!
And then just used some of the 1/8" silver ribbon  to run thru the hole and tie off.
That's it!!  A quick & easy bag or stocking stuffer ready to go in no time flat!!  I already have a few ideas of things to do on future bookmarks!!

If you're looking for some quick last-minute stocking stuffers, MDS is a GREAT go-to!!  Remember, you can download a free 30-day trial by visiting my online store!!

O.K.  Off to go check my list again!!

Merry Christmas and Happy Stamping!

Pam


Thursday, December 5, 2013

Holiday Wall Art--MDS Style

I'm sure most folks have been busy working on getting their homes decorated for the upcoming Christmas holidays!  I love that in My Digital Studio, there are SEVERAL pre-made decor items that folks can purchase and print off to have quick/easy holiday art to decorate their homes.  OR, spend a little 'extra' time and create your own images, whether out of words, or images, it's a quick/easy way to add a little extra-special touch to this time of year!!

First off, check out these cute downloads that Stampin' Up! already designed:

Home for the Holidays - 128885

Homemade Happiness - 132192
But one of the great things is that there are SO many awesome images/etc. that you can easily create art of your own.   This Santa Suit that I made last year is probably one of my favorites:
I also like to create 'alphabet' art . .. you know, when you go thru the entire alphabet and have each word relate to a specific topic?!  Well, here's a Christmas one I did:
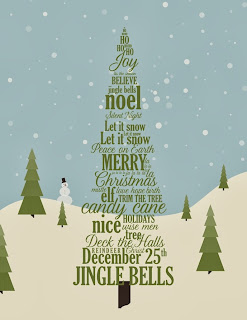
And sometimes you can use just words/fonts to create some cool looks.  And you're not limited to red/white/green--you can adapt any of the projects to match your specific holiday decor!!
My friend Ginger posted a version of this image yesterday, and when I saw it, I knew I wanted to create my own version, which was a lot of fun to do:


Or, how about taking a favorite Christmas movie quote and creating a decor piece with that?!
And of course, you're not limited to 'portrait' orientation in MDS--'landscape' works, too!!  I saw a version of this cool image last year and knew I wanted to re-create it in MDS:
But, hey, you can really go with any shape.  I have a lot of fun doing 8" square images (since I can often print them at home and have them ready to go lickety-split!), and creating the 'patchwork' look in the background on this tree decor piece:
And here, I've gone back to using just words (in this case, Christmas song titles).  For the one, I used religious hymns, and the other, popular secular tunes.

And this is just a drop in the bucket of all of the fun holiday projects you can do using My Digital Studio!  And there's still plenty of time before the holidays to order your own copy of the program and start creating!!  You can visit my online store to place your order today!!

Happy Stamping!

Pam


Sunday, December 1, 2013

Eureka!

Wow!!  I can't believe it's been over a month since I posted anything!  I am SO sorry about that, folks!!  What can I say?  Work & family has had me running in lots of different directions as of late!  I'll get back into the Stampin' Up! posts later this week, but for today, I wanted to share with you a project that I've been working on since spring, and finally got completed this past week!!

As you may or may not know, I'm the youngest in a family of 8 kids.  Well, my next oldest sibling (my 'baby' brother) Tim turned 50 in September, and I knew already last fall that I wanted to give him a quilt for his birthday this year.  Years ago on a quilting Shop Hop, I saw a quilt made up called 'Eureka!' and fell in love with it, and my mom got me the pattern as a gift later that same year.  It's been sitting in my pattern stash ever since then waiting to get pulled out and used.  Now, this quilt pattern is NOT for the faint of heart--it's absolutely stunning, and while not impossible, I knew it would be a challenge.  So, when I eventually decided to make the quilt for someone (I actually didn't feel the need to make it for myself--I just knew I wanted to make it), I wanted it to be for a special occasion, and with Mimmy (my childhood nickname for my brother) turning 50, that special occasion was now here! 

I had to chuckle when I told Mom that I was going to make this pattern for him last fall.  She asked if I was sure I wanted to put that much work into a quilt I was giving away!  Now, there are several reasons why I found humor in her asking me that--one is that she was a crocheting fiend who did these super intricate patterns for people ALL the time as I was growing up (so giving things away that I make, I actually learned from HER!).  In addition--all of us kids learned various crafts/hobbies growing up in 4-H.  Most of the boys did wood-working, the girls all sewed, and most of us have re-finished/re-upholstered furniture in there (seeing as that was Dad's business, how could we not pick up some of the tools of that trade?!), along with a lot of other interests that each of us added as we got older.  I knew that while Tim didn't sew, he could still see/understand the craftsmanship in my gift, because it simply was the family we grew up in!

So, I had the pattern figured out, but I needed to try to figure out what Mim's favorite colors were, so I asked him.  I was about ready to wring his neck when his response was 'Earth Tones'!  See, for Eureka! to work, you needed three color-ways--two complementing fabrics and one neutral.  I couldn't just do a variety of earth tones--I needed to 'pick two' and he was NOT helping matters any!!  After some deliberation and discussion with friends, I did finally settle on browns (and I needed four shades, varying from light to dark), and selected creams for the neutral, but still didn't know what I was going to put with it.  My good friend Char with went me the day I went fabric shopping, and we had an "A-Ha!" moment in the store when we saw a brown, burnt orange and cream grouping of fabrics.  It was perfect!!!

Now, 'technically' Eureka! is supposed to use 12 different fabrics--four shades in each color grouping--but with the cream fabric I selected, Char & I realized that I could simply use it for all of the creams in the quilt, which would also allow the other colors/fabrics to 'pop' on the quilt a bit more!  I wound up selecting four shades of tan/brown; four shades of peach/orange, and of course, my cream.  For the backing I decided to use the lightest peach shade of fabric I had selected, and for the binding, one of the darker browns. 

I wasn't going to be starting small on this pattern--my brother has a King-sized bed, which meant the quilt would have to match that!  So in looking at the pattern, that meant I needed to make 144 total blocks, consisting of 9 different designs (I made anywhere from 4 to 24 blocks of each design).  You'll notice in the photo that there are 10 blocks shown, but the middle block in the third row, as well as the block below it are actually the 'same' block--I just had to orientate half of them the opposite direction of the first ones I did.
I started this quilt back in the spring, but there's been a lot going on in my life, so unfortunately, I didn't get it completed by Mim's birthday in mid-September, but my sister and her husband were going to be seeing him over Thanksgiving Weekend, so I knew if I got it done, they'd be able to take it with them and give it to him then!

Once I got ALL 144 blocks made, it was time to start assembling.  I actually broke the quilt down into 'eighths' and created sections that were six blocks across by three blocks down (remember, the quilt itself, having 144 blocks means it's 12 blocks across & 12 blocks down) to make the pieces more manageable.  I turned those 'eighths' into quarters, which I then attached to one another.
Of course, once I got the top assembled, I wasn't home free yet!  Next up was getting it quilted.  So, I set up a time to head over to my friend Pat's house and use her HQ Advante' to quilt it.  The quilt itself was stunning, and there are SO many different directions a person could go, but I decided to stick with a simple all-over meander design. 
The quilting actually went relatively quick--other than a minor hiccup at the start--I didn't get the thread tension set up correctly on the machine (it looked right, I just forgot to put the thread into a groove), so after two passes of the pattern in a half hour, I discovered the thread had badly looped on the bottom of the quilt, which then entailed a hour of ripping out  everything that had just been stitched!!  But after that minor snag, the quilt stitched up beautifully!

I somehow lucked out in that the weekend before I needed to have this quilt done, I had several extra days off from work, so I was able to focus solely on the quilting and attaching the binding, and was able to have the quilt completed three days before I actually needed it!!  Check it out:
And a couple more close-ups of the quilting and the backing/label.  I used a peach thread that matched the backing fabric as my quilting thread.

I was able to get the quilt wrapped up and send it with my sister Deb & brother-in-law Chris this past weekend, and they sent me this photo of Tim with his quilt when he opened the package:
And last night, I got this photo from Mimmy.  Made me smile and warmed my heart to see that he already has the quilt on his bed at home!!  That's exactly where it should be--in use!
Whew!!!  And one would think I'd be sick of sewing by now, but nope--I've been working on the quilt kits I bought back in July in Utah over the holiday weekend, and now have another throw-sized quilt top completed (this one for myself!) and have the basics on a simple table topper ready to go, too!

I hope you & yours had a wonderful Thanksgiving weekend filled with food, family & friends!

Happy Crafting!

Pam


Saturday, October 26, 2013

Double Irish Chain Quilt

Hello!! My posts have been a bit sporadic as of late, as I have some family things going on that are taking most of my attention--I'll share more there in the next week or so--I haven't been able to post as much as I'd like here.  But today's post is actually a non-stamping one!!

I had a niece get married in late August.  For years, when any of my nieces or nephews get married, their gift from me is a queen-sized bed quilt.  I absolutely LOVE the quilt designer Eleanor Burns, and tend to gravitate towards her patterns when I'm picking the pattern for each of the quilts.  Last year when my niece announced her engagement, I knew immediately which pattern I wanted to do for her quilt.  I absolutely love the Double Wedding Ring quilt pattern, but knew I did not have the time to create that design, and Eleanor has a pattern called Irish Chain, with the alternate Double Irish Chain that I thought had a similar look to the Double Wedding Ring, but was a more manageable pattern to create!!

As for colors, I also knew the direction I want to go there.  Sometimes I'll ask the couple for their favorite colors and try to put them into the quilt, but other times I'll have inspiration strike, which was the case here.  The wedding colors were going to be gray and a deep pink of sorts, so that's the idea I went shopping for fabric with.  Now pink isn't exactly the most 'manly' of colors, and since this was for the couple, I didn't want my new nephew-in-law to have to run screaming from the room with the colors I used in the quilt, so I wanted to find a more 'muted' pink which lead me to the mauve I ended up with.  The gray complimented it nicely, and then I needed to find a neutral color for the background.  Initially, I was going to go with a white, but then I came across the fabric I ended up selecting, and again, the background fabric complimented the other two colors really well, so it just seemed like the combo was 'meant to be'!! 

One of the features I really love about Eleanor's patterns is that there is a lot of strip piecing that allows the pieces to come together quickly.  For about half of the block in the quilt top, there were three different strip set combos that I needed to assemble, then cut to create the final blocks:

Strip Sets
Cutting Strip Sets
Completed Block from Strip sets.
These were used in addition to a second, simpler block to create the center of the quilt, then the Seminole Borders and 9-patch corner blocks added to that.

Completed Quilt Top Before Quilting
I'm lucky in that I have two really good friends who allow me to use their longarm machines when I have projects, so I'm able to do the quilting on the quilts myself as well.  The one common thread that I use on all of the wedding quilts for my nieces/nephews is that I use a design called "Hearts & Swirls" in the quilting.  My friend Pat recently upgraded her HQ Sixteen to and HQ Advantage machine, and the machine worked like a dream!!  Normally it would take me about 8-10 hours of quilting time for a quilt this size--I had this one done in about 6 1/2 hours, once it got 'loaded' on the machine.  Now, part of that time difference could very well be that I've gotten more comfortable with the longarming aspects of the work, but I also contribute it to the upgraded machine as well. 

Loaded on Machine--Pantograph (Quilting Design) on the table to the right
Close-up of some of the Quilting
Almost done with the machine quilting!!
Once I had the quilt longarmed, I trimmed off the extra batting and backing and then machined sewed on the binding before folding it over the edge and hand-sewing it down on the back of the quilt.

Completed Quilt
(special thanks to some staff at the campus library for holding the quilt for the photo for me!)
Close-Up of Quilting
Edge of quilt with backing fabric to the upper right.
One of the last things I do on the quilts is to attach a label on the back, usually with the couple's names, wedding date & quilt info. 


I delivered the quilt this past Tuesday.  Normally I like to have the quilt done by the wedding, but with all of the things going on in my life, this one wasn't able to be 'quite' completed on time, but I'm happy that it's now with the intended recipients!!

I have a few more quilt projects on my plate, and will likely be showing off another one of those in the near future, but in the meantime,

Happy Crafting!!

Pam