Monday, December 15, 2014

December Diva Blog Hop--Christmas/Winter

Merry Christmas, Everyone!!

If you're joining me from Amy's Blog, I'm the last stop for today.  If you just started here, feel free to head to Sue's Blog and start from the beginning to hop thru all the sites!

My house has been a flurry of activity in getting Christmas gifts made/out, and while I 'could' show those items, since they ARE gifts (and some of my family does check out my blog from time to time!), I thought I'd show a couple cute ideas I made using my Silhouette Cameo (electronic cutter) and My Digital Studio (MDS) instead!!

Now, a lot of the files in MDS are now .svg files, and if you have the 'Deluxe' version of the Silhouette software, you can open those files up directly and use them in the e-cutter!  BUT, often times, I find that I like to play around with my design in MDS and then just create a jpeg of my page, which I can then 'open' and 'trace' in the Silhouette program.  I won't get into too many details on that today--but feel free to contact me if you'd like more information on how to do that!!

So for these first two, I used the Project Life Holiday Cheer digital download and since they were .svg files, it was really easy to open them up, and then manipulate them to fit the floating frame (I decided to use 6"x8" floating frames on these first two).

PL Holiday Cheer Digital Download

Another little tip--if I'm making a design to go in a 6"x8" frame, I limit my design size to 5"x7"--at least 1/4" all the way around will be hidden by the frame itself (since the glass needs to sit on a lip), which gives 1/4" of a 'blank' border.  Now, you won't see that 'exactly' in the photos that I'm showing, since these were some of my first attempts at cutting vinyl and adhering to glass, but on subsequent projects, I learned my lesson!!  I also went thru my files and found a free 'checkmark' download that I had, and set that up to get cut out as well.

Naughty/Nice in Floating Frame 6"x8"
Cutting the vinyl (which is adhesive-backed) went pretty slick, and I also realized later that I wouldn't necessarily need to add the checkmark--you could use a dry-erase marker on the front, and use it at home as a naughty/nice barometer with your kids if you so chose!

Baby, It's Cold Outside in Floating Frame 6"x8"
I had fun also putting both of these designs in white and silver frames--all of them look really cool!!!

Now, for this next one, I did spend some time in MDS designing/cropping images to create the look I was going for.  First of all, I used the tree from the Project Life Holiday Cheer digital set again. . .  then I went looking thru my files for a 'Countdown to Christmas' option, and finally settled on the 'Daily December Memories Digital Photobook Template' download (which has DSPs, stamp brush sets, LOTS of embellishments, and a Photobook template all included!!), as I could find all the the words I wanted, and after a little cropping, had my completed design!!

Stamp Brush Images from 'Daily December Memories' download
Countdown to Christmas image
Once I had the .jpeg above created, it was a simple matter to do a trace in my Silhouette program, clean up a few things, and then send it to cut my various colors of vinyl!

Countdown to Christmas Floating Frame 11"x15"
(And yes, I know we're only about 10 days away now--the above photo has been sitting in my camera since then!)  Knowing that I can use My Digital Studio in conjunction with my Silhouette Cameo has just TOTALLY opened up even more creative possibilities!!

I hope you've enjoyed the Blog Hop stops along the way today!  For quick reference, here are the links to everyone's sites:

Happy Hopping!!  Oh, and we'll be back and blog hopping once again in 2015!!  Keep checking back!

Pam

Saturday, November 15, 2014

November Diva Blog Hop--Fall

Hey, Folks!!

If you're joining me from Amy's Blog, I'm the last stop for today.  If you just started here, feel free to head to Sue's Blog and start from the beginning to hop thru all the sites!

My post is going to be super short today (I'm off to a Craft Fair for the day), but it's SUCH a cute/fun project.  It's made using our Curvy Keepsakes framelit that is in the Holiday Catalog, and could be a perfect place card holder for Thanksgiving!  If you check out project ideas online, you'll see that there are SO many creative folks out there that have come up with a lot of other fun ideas using this framelit as well!  The possibilities appear to be endless!!


On the body of the pumpkin, I used the stripe from 'Work of Art' and stamped in Pumpkin Pie Ink.  I stamped the 'so thankful' (from Holiday Cheer set) in Early Espresso Ink on Very Vanilla framelit feathers, and took a 11" x 1/4" strip of Wild Wasabi that I wrapped around a marker and curved it.  Then, pierced the feathers and 'stem' and strung a piece of Baker's Twine thru and tied a bow (after closing up the pumpkin and filling it with chocolate, of course!) around the handle!!  I have totally fallen in love with making these little guys, and would have a whole patch of them on my table if I had the time!!


For quick reference, here are the sites that are hopping today:
Happy Hopping!!

Pam 

Tuesday, November 4, 2014

Election Day & MDS

Hey, Folks!!

You know, sometimes life just seems to happen and unfortunately, things like my blog here just don't get done!!  Today is Election Day in the United States, and after I got home, I happened to change my personal Facebook Cover Photo to indicate as much, and it reminded me of how great My Digital Studio (MDS) software is to create things like this!!  I had created the image a couple years ago, and just re-post it on Election Days since then!


In my opinion, one of the best things about MDS is that you can use images (as long as they're in the correct forms) within the program that are not JUST from Stampin' Up!!  This completely opens up a new realm of possibilities.  I've spent a fair amount of time searching out 'free' downloads to use with MDS, so was super excited when I came across a 'free' patriotic download (just do a web search for free digital scrapbooking downloads--you'll come up with lots of options!!) a few years ago.  I LOVE the fact that it had a ballot box embellishment, as well as the 'I Voted' badge/ribbon, as well as coordinating backgrounds!!

So, think outside the MDS box.  While I absolutely LOVE all of the great downloads that Stampin' Up! offers, you are NOT limited to use JUST those downloads in this program, so if you come across a download from another (*gasp!*) company that you fall in love with, as long as the images are in .png, .jpg & .svg formats, you CAN use them in your MDS program!!  Exciting, isn't it?!

Now, remember, you can always try out My Digital Studio for FREE (for 30 days) by visiting my online store, so why not download it and start creating today?!

Happy Stamping!

Pam

Wednesday, October 15, 2014

October Diva Blog Hop--Halloween

How is it possible that it's already Diva Blog Hop time for the month?!  If you're joining me from Sandy's Blog, I'm the last stop for today (We're a small group this month!).  If you just started here, feel free to head to Sue's Blog and start from there!

Today's theme is 'Halloween'!!  And it just HAPPENS to be my favorite holiday of the year!!

So, to start off, I want to share some Chalkboard art I saw demonstrated at Convention this summer.  For non-Stampin' Up! supplies, you'll need a chalkboard, chalk, a 'pencil' sharpener & aerosol hair spray (Aqua Net was suggested for use, but I was unsuccessful in tracking any down, so just used a different brand--BUT it DOES need to be an aerosol can).  To create the design, I used My Digital Studio (MDS) and created the image I wanted to transfer on to the chalkboard.

Design created using My Digital Studio
Next up, I exported the jpeg then re-inserted it into a new page/photo in MDS and then MIRRORED the image, which I printed out on my home printer through the program.
Mirrored image
I found this next part of the process to be a tad 'putzy', so I HIGHLY recommend for your first project that you pick an image that does not have too much detail, so you don't get frustrated as you work!!  So, now you'll need to sharpen the chalk stick to a sharp point and begin to draw on top of all of the printed lines on the paper.  You'll frequently need to stop and re-sharpen the chalk.  I think I went thru almost two full sticks for this entire project.  For lack of a better explanation, you're basically creating a 'chalk carbon' of the image to use in the next step.

When you get the design fully traced, you'll want to lay it carefully on top of the chalkboard and rub to 'transfer' the image to the chalkboard.  BUT, you're not done yet!!  Now comes the fun part.  To re-draw over the transferred image lines to darken them!!
You can see part of the trace still remaining to be filled in on the word 'Halloween'
And here's the completed image:

Now, obviously chalk on a chalkboard is NOT meant to be permanent, which is where the hair spray comes in.  The hair spray allows the chalk to 'set'.  Either way, it's still not completely permanent--to do that you'd need to use a sealant of some sort.  So if you want to clean off the chalkboard after the holiday and create a new design, you can do so using a little soap and water!
Chalk image with hair spray applied
O.K.  Do NOT freak out when you hit the design with hairspray.  It will 'look' like it's disappeared, but as it dries, the image will re-appear.  I found on mine, however, that some of my images did not stay as dark, so I reapplied some of the chalk and hit it a second time with hair spray, which helped.
Completed design next to mirrored transfer image
AND here it is on display in my living room:


MDS is SUCH a great tool for holiday (Halloween) decorating.  If you check out my Diva Blog Post from last month, there is the great coffin download for Halloween treats, and this week, one of the Weekly Deals is the 'Spooky Treats Designer Template Download'.  I already own it, but for those of you who don't, it's a GREAT deal to check out!
 The kids in your neighborhood will be flocking to your door when they hear about your irresistible Spooky Treats. With this digital-exclusive kit, you’ll have designed candy wrappers, lollipop collars, and a soda wrapper along with additional elements to make coordinating projects. Kit includes a 15-piece stamp brush set, seven Designer Series Paper patterns, four embellishments, one punch, and a three-page 8-1/2" x 11" treat template. Coordinating colors include Basic Black, Lucky Limeade, Pumpkin Pie, and Whisper White.

So, you know I can't talk about MDS without sharing some scrapbook pages, and I happen to have a 'few' that fit today's theme perfectly!!

These first two pages are template pages that came with some of the MDS downloads I did:


And a few more designs I CASEd (copied and 'stole' everything) to highlight some of my adorable great-nephews:

I have a couple other pages I created a few years ago that I'm still waiting for the perfect photos to put into the pages--also ideas that I copied from other talented folks!

I really do NOT spend a lot of time putting photos of me into pages, but I do have a few.  First of all, my best friend Sera and I.  Our mom's made each of our costumes.
And a few different looks of me over the years:

And finally, a couple photos of my college roommates and I on the holiday (over 20 years ago--YIKES!!)!  I created these two pages as a two-page spread.


I hope you've enjoyed our Halloween Diva Blog hop today, and that you have a few ideas to get ready to have a Spook-tacular holiday yourself!!

For quick reference, here are the sites that are hopping today:
Happy Hopping!!

Pam  

Monday, September 15, 2014

September Diva Blog Hop--Holiday Catalog

How is it possible that it's already Diva Blog Hop time for the month?!  If you're joining me from Amy's Blog, I'm the last stop for today.  If you just started here, feel free to head to Sue's Blog and start from the beginning to hop thru all the sites!

Today's theme is the Holiday Catalog.  I LOVE all of the catalogs that Stampin' Up! publishes, and there are SOOOOOO many things that I fell in love with from this one when it was revealed at Convention this past summer!!  Today, though, I'm going to 'mainly' focus on the My Digital Studio Downloads that were featured in it!!

I think it's safe to say that when the Nordic Village Designer Templates were shown up on the screen at Convention, I got a little excited.  As SOON as they became available for me to order, I had them purchased/downloaded and was printing them off.  I did have to adjust a couple little things in order to print the items on my printer at home, but they were super easy to cut out!  I then used Sticky Strip to attach the sides/bottom of each 'house'.  Because they're paper, I'm not going to use 'real' tea lights in them, but will place an LED light in each one when I display them!!


Now, as soon as I got these houses done--I KNEW I needed to create a 'Halloween' version of the village (basically just changed colors, and added, a ghost, bat & cat), and am looking forward to having these out in a couple of weeks:


Moving on to the Halloween Bites Designer Templates, I had a lot of fun making the vampire-wrapped candy bar and coffin, or even just the simple 'bat wrap'.  I added some green neon shredded paper for the vampire to lay in, which was the 'perfect' final touch!!


I LOVE the All Is Calm Party Ensemble--and you can use it to decorate for your Christmas or New Year's parties (or both!).  This ensemble includes a banner, favors (LOVE the crackers--I haven't made them yet, but am looking forward to doing so!!), invitations, thank you notes & more!


And finally, the Annual Report Postcard Template.  This download is PERFECT for letting everyone know the highlights of your year and a quick/easy double-sided layout to just drop in your photos and add your text!


But wait!!  Those 'might' be the only items that were specifically highlighted in the Holiday Catalog, but there are a few more digital downloads that came out at the beginning of the month that happen to be the digital versions of some of the other items in the Holiday Catalog.  Who doesn't already love the For All Things Stamp Brush set, and the coordinating Color Me Autumn Designer Series Paper?!


The Holiday Home stamp brush set can cover all of your fall/winter holidays (or even new home congratulations!).


And for the Project Life lovers, there is the Holiday Cheer stamp brush set and the Seasonal Snapshot Digital Project Life Cards!

I hope you've enjoyed checking out all of the great posts about the Holiday Catalog that the ladies shared today!!  And for quick reference, here are the sites that are hopping today:
Happy Hopping!!

Pam  

Friday, August 15, 2014

August Diva Blog Hop--Favorite Accessory

Well, folks, it's that time of the month again--Diva Blog Hop day!!  If you're joining me from Amy's Blog, I'm the last stop for today.  If you just started here, feel free to head to Sue's Blog and start from the beginning to hop thru all the sites!

Today's theme challenged each of the Diva's to share their favorite stamping accessory with you.  And really, I had a HECK of a time trying to narrow down WHICH accessory to show.  My initial thought was to go with My Digital Studio, BUT really, that doesn't qualify (in my mind) as an 'accessory' by the definition of today's theme, no matter how much I want to justify it!  So then, do I say 'Big Shot', but if I do, what do I show?  The Bigz & Original Dies, Framelits, Edgelits & Thinlits, Embossing Folders, or Embosslits??  Or, what about the awesome Punches that Stampin' Up! offers?!  Heck, I even consider the adhesives that we use an accessory.  Really, who can go without Glue Dots or Dimensionals, let alone SNAIL (just to name a few) when paper crafting?!  I am in LOVE with our Scoring and Piercing tools, as well as bone folder, paper trimmers and scissors.  How is a Diva to choose?!

BUT, when it's all said and done, I decided that I wanted to talk about one of the first paper crafting tools/accessories I ever bought/used.  In the interest of full-disclosure, this item is something that I bought before I even realized that Stampin' Up! sold it, so while both work EXACTLY the same way, my purplish-pink one that you'll see in the following photos is NOT the color that Stampin' Up!'s sleek unit comes in!  So what, exactly am I going to talk about?!  Why the Stamp-a-ma-jig, of course!!


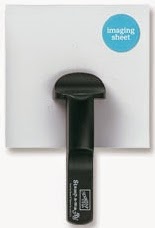
Truthfully the Stamp-a-ma-jig scared and confused me when I first saw it.  BUT, once I got over that, I realized how much of a life saver this little gadget is, it's now something that is always sitting and ready for me to use when I need it!!  Basically (and according to the product description on the Stampin' Up! web site), the Stamp-a-ma-jig help you place stamp images exactly where you want them every time.  It has a nonskid base and a sturdy plastic construction.  It comes with a washable plastic sheet and instructions for use.

The Stamp-a-ma-jig is really a life-saver when you're doing two-step stamping.  I have found that I don't pull it out QUITE as much with my clear blocks as I used to, but it still comes in handy for even the clear-mount and photopolymer sets--especially when I just need to 'make sure' things are lined up properly. 

I even learned something I didn't know when researching the Stamp-a-ma-jig for today's blog post.  Did you know that there is a purpose to the two different textured sides to the imaging sheets?!  The smooth side is supposed to be used for Classic Ink, and the rough side is for Craft Ink!!  Cool, huh?!

I have heard from a lot of 'seasoned' demonstrators that they just don't 'get' the Stamp-a-ma-jig, so for today's post, I'm going to show you a brief tutorial for using this product!

Most instructions say that you're supposed to lay it down like a 'T', and then place the imaging sheet into the corner on either the right or left side of the 'T' (as shown below). The imaging sheet is a little hard to see in the photo, but hopefully you get the gist.
For me, however, I found that it works best if I have the Stamp-a-ma-jig 'upside down' and bring the imaging sheet into the bottom left corner instead of the top left:
I highlighted around the imaging sheet in the photo to help you see it a little better, but basically, you see where that arrow is pointing?  That's where you want one corner of the imaging sheet to securely fit into the Stamp-a-ma-jig. 

So, once the imaging sheet is in place, you're going to want to ink up your image and stamp it on to the imaging sheet, making sure to line up the stamp in the corner of the Stamp-a-ma-jig.
And now when you take the stamp away, you'll be left with the zig zag on the imaging sheet!
Now we're ready to stamp on the cardstock!!  I used a piece of Whisper White cardstock (I'm using Blackberry Bliss Classic Ink), and I actually came across another cool tip/trick.  It was suggest that to help your paper stay in place and not move, to add a small piece of SNAIL adhesive to the center/back of it!  Works pretty slick, I found!
O.K.  So next up is to line up the imaging sheet on the cardstock.   Once the imaging sheet is in place, bring the Stamp-a-ma-jig over and line it up to the corner of the imaging sheet.  You'll notice that there's a little vertical space between the cardstock and the Stamp-a-ma-jig.  THIS IS JUST FINE!!  You want the image lined up correctly on the cardstock, so having just a corner of the Stamp-a-ma-jig catching the cardstock is completely normal!
Once you have everything in place, hold down the Stamp-a-ma-jig and remove the imaging sheet.  Then ink up your stamp and line it up with the corner of the Stamp-a-ma-jig and stamp on the cardstock!
Ta-da!!
I want to repeat the image below the first zig zag, so bring back the imaging sheet (but lighter, so I'm "stamping off" as I go each time).  Now you can see where the first image is, and you can line up the imaging sheet to where you want the next zig zag to go, and again place the Stamp-a-ma-jig in the corner.
Repeat the process and continue down the cardstock until the image is stamped as much as you'd like!
O.K.  So I'm using the stamp set 'Work of Art' for this card, and once I get the zig zags done, I want to add my greeting to the image.  So, I pull out my Jet Black Staz-On, and turn my imaging sheet a quarter turn (no worries if the other inks have dried--use some Stampin' Mist, or I've even found dish soap with an old toothbrush works, to clean off the sheet and it will be good as new to use again and again!), and line up my imaging sheet and Stamp-a-ma-jig for the word 'you'.
Then, place the imaging sheet over the zig-zagged Blackberry Bliss image, and decide where you want the 'you' to be inked.  Once that's decided, bring the Stamp-a-ma-jig over and line it up with the corner of your imaging sheet. 
Remove the imaging sheet, ink up your image and line up the stamp in the corner of the Stamp-a-ma-jig and stamp it on the cardstock.  Then, repeat for the word 'THANK'.
And there you have it!!
Now all that's left is to finish up!
I used the new embossing folder (appropriately named 'Zig Zag'!) to add texture to the Rich Razzleberry Cardstock that was mounted on Blackberry Bliss.  Also a little 1/8" Silver Ribbon, and a few rhinestones complete the card.

One other thing to note for the Stamp-a-ma-jig--you can really place it on the right/left/top/bottom of the imaging sheet, so it works well for right-handed or left-handed folks!  And the Stamp-a-ma-jig can be placed vertical or horizontal to the imaging sheet as well.  Check out these examples:


Make sense?!  I only showed the bottom placement of the Stamp-a-ma-jig in these four photos, but just imaging turning the photos upside down and you get the other placement options as well!!  The biggest thing is that the corner of the imaging sheet needs to go into the corner of the Stamp-a-ma-jig 'T', and from there, everything else falls into place!!

I hope you've enjoyed checking out one of my favorite accessories, the Stamp-a-ma-jig, as well as checking out all of the great idea the ladies here have shared today!!  And for quick reference, here are the sites that are hopping today:

Happy Hopping!!

Pam