Friday, January 16, 2015

What's Cookin'?!

With the start of the year, things are finally settling down a little for me--I always seem to have multiple irons in the fire, but I'm never bored!  I needed to wait until after Christmas to share this project/post, but I did want to spend some time and share how Stampin' Up!'s digital program--My Digital Studio (MDS)--saved my butt when it came to Christmas gift-giving a few weeks ago!

O.K., so backing up a little, I purchased a Silhouette Cameo this fall, and have been fun working with that device in conjunction with MDS.  I think I've mentioned in the past that I have a large family, so I typically do one 'family' gift per sibling that is the same across the board.  I had plans to use the Cameo for my family gifts this past year, but as Thanksgiving loomed, I just was not able to find all of the supplies I needed for that project, which meant that I needed to re-group and move on to "Plan B". And that meant My Digital Studio to the rescue!!

So Thanksgiving Weekend I buckled down and decided to get to work on creating a 'Family Recipe Collection' using the Easel Calendar Template option.  I had downloaded the 'Most Loved Seasonal Recipes' template when it came out, and I had been compiling a list of favorite recipes from my siblings, so it was just a matter of getting them down into the Recipe Book!!

There's no hard/fast rule as far as what sort of template to use to create recipe books, but I knew I wanted to do the Easel Calendar, so that the recipe could be self-standing while someone was using it, and the fact that I already had the 'Most Loved Seasonal Recipes' template was just a no-brainer!!


O.K.  One other cool fact I noticed, when I was in the designer template screen (above), I discovered that I could actually RESIZE the window to fill the screen, which gave me a better view of my template options as well as the preview of what was included in each template!  How cool is that?!  I'm going to be using that option all the time now when I'm using a designer template!!  I'm a fan of the 'Made from Scratch' recipe template option, BUT, with the timeline I had to work with, there was no way for me to be able to take photos of the various completed recipes (which mean a lot of cooking) as this template was designed AND be able to get the book done and to the Stampin' Up! print services!!

I was able to get everything entered, and proofed and was able to send my order off to Print Services and was SO super happy with the end product!!  Here are a couple of the original template pages and the edits that I chose to make to fit my preferences.  First up, the cover:

I decided to change up the front a little--had the DSP extended to cover the entire front.  I removed the lattice stamp as well as the title and the words on the banner and picked a font (that I color matched to the green on the DSP) to create 'my' title for the book:

The template had seasonal recipes, and as such, each 'season' was a slightly different color scheme.  I just decided to mix up the pages, and not specify a season or 'type' of dish (appetizer; beverage; main dish; salad; soup; bread; dessert; etc.)


I liked the layout, but I didn't always have the info regarding the Source of the Recipe, Prep Time, or Serving Size, so I opted to crop and use 'serves' where applicable, but deleted the rest of the information in the 'Title Banner' and replaced it with a Text Box for the name of the recipe.  In the interest of creating more 'space' for the recipe, I moved the banners 'up', as well as deleting the 'type' of dish each recipe was.  I had considered leaving that info, but I decided to simplify things (LOVE the editing options to create 'just' what I want!!).

 Some recipes, like above, were pretty simple.  I also had others that were short, so decided to include two on a page (below):

 On the recipe above, I included some 'additional info' at the bottom, using the SAME font as the title on the page, but changing the color to match the banner in order to keep it uniform on the page, but also allow it to be noticed.

The 'back cover' I debated on a bit.  The template has a very boring (Sorry, SU!) back cover, and I had thought about putting a recipe on the page, but then I also realized that there would be some printing barcode thing that would get put on the page, and didn't want information getting cut off.  Instead, I opted to use the same DSP as the front cover, and picked one of the banners from the titles, sized it down and then put in a message of my own.


And here are a couple of the finished pages of the actual book:


I am SOOO glad that I had My Digital Studio to fall back on when I needed to come up with a special gift, and it was a big hit with my siblings when they got their Christmas presents!!  I even have requests to print a couple more for my nieces/nephews, which is easy to do since I have a completed project that only needs to be re-submitted!!

I have always been a believer that the possibilities of My Digital Studio is really only limited by one's imagination, so why not start your creative journey today?  You can try out My Digital Studio for FREE (for 30 days) by visiting my online store, so why not download it and start creating?!

Happy Stamping!

Pam

Thursday, January 15, 2015

January 2015 Diva Blog Hop--Theme: NEW

Happy NEW Year, Everyone!!

If you're joining me from Amy's Blog, I'm the last stop for today.  If you just started here, feel free to head to Sue's Blog and start from the beginning to hop thru all the sites!  I hope you're enjoying the fact that we're back for another year as much as we enjoy coming up with projects and ideas to share with you!

Today's theme is:  'New'.  Each of us got to pick what our definition of 'new' was for the post, so you've seen lots of different ideas!!  We have Sell-A-Bration happening now, as well as a brand NEW Occasion Catalog.  There's a New Year, with New Possibilities, and there's always the potential for New Arrivals.

I was SUPER excited when I saw that Stampin' Up! released the digital version of Zoo Babies at the beginning of January, and with that being a 'new digital set' to use in My Digital Studio, that's what I'm going to share/show today!

138140--Zoo Babies Digital Stamp Brush Set
So, for my initial inspiration, I decided to CASE (Copy And Share Everything) the designs showcased in the Annual Catalog on Page 78.  Totally loving this card, and the Crisp Cantaloupe/Hello Honey combo on it!

A few other fun things to note: I used the digital Lullaby DSP, and I re-colored the wooden heart embellishment (new thought just as I'm posting--I could have just added a drop shadow to keep the wooden heart look more 'wooden', with just a splash of color beneath).  I cropped a piece of the paper doily and added white baker's twine.  Really quick/easy to put together!!

Now, the other design on Page 78 was actually showing a framed name.  I decided to change it into a card, and it was fun to come up with my options for turning a 3D item into a card-front!

My first challenge on this one was figuring out the frame to use.  Initially, I tried the Whisper White Fancy Frames Embellishment, but it was just too much.  So then I tried the Basic Gray frame, recolored it to Whisper White, and it was PERFECT!! I used the Circle Punch, size down to about 3/4" and the Mini Flag Banner Punch that were filled with either color or digital Lullaby DSP (all with drop shadows).  For the stitching I used a Freeform Circle that I changed the line style to 'stitching', and colored it to white.  This card just makes me smile every time I look at it.  And I have a friend due in a month or so--I think I know what card will be getting attached to the gift there!!

And here are two other cards that I decided to have fun and design using the digital version of Zoo Babies:
A couple cool things on this card. . . . the background on the card I saw designed was made using the Alphabet Press Embossing Folder, but there currently isn't a digital version of that one available, so I used a piece of the 'Soho Subway' paper that I inserted into a photo box and then re-colored it to Smoky Slate.  The other fun step was adding the ribbon.  I added the Knots and Ties Trim 2 in Whisper White and then cropped the image so that just the bow was visible.  Then I copied and duplicated that piece two more times.  I turned one of the pieces 15 degrees to the right, and another 15 degrees to the left.  Brought the one I had not rotated at all to the front of the three pieces, then centered and grouped them before placing on the front (turned 90 degrees) of the card and adding a button on the middle of the grouping.  
This card also makes me smile.  Pretty simple, and really, could be just about any color combination--here I'm using Smoky Slate, Melon Mambo & Pool Party (with Basic Black & Whisper White, of course).  I used the coloring tool to add just a touch of black to the toucan's beak, feet, legs & eye.  Going back, I think I might add a small circle of black on the eyes of the other two animals, too--but it's even cute just like this!!

So, there you have it, a couple fun New card ideas for the New Arrivals in your life!!

I hope you've enjoyed the Blog Hop stops along the way today!  For quick reference, here are the links to everyone's sites:

Happy Hopping!!
Pam

Monday, December 15, 2014

December Diva Blog Hop--Christmas/Winter

Merry Christmas, Everyone!!

If you're joining me from Amy's Blog, I'm the last stop for today.  If you just started here, feel free to head to Sue's Blog and start from the beginning to hop thru all the sites!

My house has been a flurry of activity in getting Christmas gifts made/out, and while I 'could' show those items, since they ARE gifts (and some of my family does check out my blog from time to time!), I thought I'd show a couple cute ideas I made using my Silhouette Cameo (electronic cutter) and My Digital Studio (MDS) instead!!

Now, a lot of the files in MDS are now .svg files, and if you have the 'Deluxe' version of the Silhouette software, you can open those files up directly and use them in the e-cutter!  BUT, often times, I find that I like to play around with my design in MDS and then just create a jpeg of my page, which I can then 'open' and 'trace' in the Silhouette program.  I won't get into too many details on that today--but feel free to contact me if you'd like more information on how to do that!!

So for these first two, I used the Project Life Holiday Cheer digital download and since they were .svg files, it was really easy to open them up, and then manipulate them to fit the floating frame (I decided to use 6"x8" floating frames on these first two).

PL Holiday Cheer Digital Download

Another little tip--if I'm making a design to go in a 6"x8" frame, I limit my design size to 5"x7"--at least 1/4" all the way around will be hidden by the frame itself (since the glass needs to sit on a lip), which gives 1/4" of a 'blank' border.  Now, you won't see that 'exactly' in the photos that I'm showing, since these were some of my first attempts at cutting vinyl and adhering to glass, but on subsequent projects, I learned my lesson!!  I also went thru my files and found a free 'checkmark' download that I had, and set that up to get cut out as well.

Naughty/Nice in Floating Frame 6"x8"
Cutting the vinyl (which is adhesive-backed) went pretty slick, and I also realized later that I wouldn't necessarily need to add the checkmark--you could use a dry-erase marker on the front, and use it at home as a naughty/nice barometer with your kids if you so chose!

Baby, It's Cold Outside in Floating Frame 6"x8"
I had fun also putting both of these designs in white and silver frames--all of them look really cool!!!

Now, for this next one, I did spend some time in MDS designing/cropping images to create the look I was going for.  First of all, I used the tree from the Project Life Holiday Cheer digital set again. . .  then I went looking thru my files for a 'Countdown to Christmas' option, and finally settled on the 'Daily December Memories Digital Photobook Template' download (which has DSPs, stamp brush sets, LOTS of embellishments, and a Photobook template all included!!), as I could find all the the words I wanted, and after a little cropping, had my completed design!!

Stamp Brush Images from 'Daily December Memories' download
Countdown to Christmas image
Once I had the .jpeg above created, it was a simple matter to do a trace in my Silhouette program, clean up a few things, and then send it to cut my various colors of vinyl!

Countdown to Christmas Floating Frame 11"x15"
(And yes, I know we're only about 10 days away now--the above photo has been sitting in my camera since then!)  Knowing that I can use My Digital Studio in conjunction with my Silhouette Cameo has just TOTALLY opened up even more creative possibilities!!

I hope you've enjoyed the Blog Hop stops along the way today!  For quick reference, here are the links to everyone's sites:

Happy Hopping!!  Oh, and we'll be back and blog hopping once again in 2015!!  Keep checking back!

Pam

Saturday, November 15, 2014

November Diva Blog Hop--Fall

Hey, Folks!!

If you're joining me from Amy's Blog, I'm the last stop for today.  If you just started here, feel free to head to Sue's Blog and start from the beginning to hop thru all the sites!

My post is going to be super short today (I'm off to a Craft Fair for the day), but it's SUCH a cute/fun project.  It's made using our Curvy Keepsakes framelit that is in the Holiday Catalog, and could be a perfect place card holder for Thanksgiving!  If you check out project ideas online, you'll see that there are SO many creative folks out there that have come up with a lot of other fun ideas using this framelit as well!  The possibilities appear to be endless!!


On the body of the pumpkin, I used the stripe from 'Work of Art' and stamped in Pumpkin Pie Ink.  I stamped the 'so thankful' (from Holiday Cheer set) in Early Espresso Ink on Very Vanilla framelit feathers, and took a 11" x 1/4" strip of Wild Wasabi that I wrapped around a marker and curved it.  Then, pierced the feathers and 'stem' and strung a piece of Baker's Twine thru and tied a bow (after closing up the pumpkin and filling it with chocolate, of course!) around the handle!!  I have totally fallen in love with making these little guys, and would have a whole patch of them on my table if I had the time!!


For quick reference, here are the sites that are hopping today:
Happy Hopping!!

Pam 

Tuesday, November 4, 2014

Election Day & MDS

Hey, Folks!!

You know, sometimes life just seems to happen and unfortunately, things like my blog here just don't get done!!  Today is Election Day in the United States, and after I got home, I happened to change my personal Facebook Cover Photo to indicate as much, and it reminded me of how great My Digital Studio (MDS) software is to create things like this!!  I had created the image a couple years ago, and just re-post it on Election Days since then!


In my opinion, one of the best things about MDS is that you can use images (as long as they're in the correct forms) within the program that are not JUST from Stampin' Up!!  This completely opens up a new realm of possibilities.  I've spent a fair amount of time searching out 'free' downloads to use with MDS, so was super excited when I came across a 'free' patriotic download (just do a web search for free digital scrapbooking downloads--you'll come up with lots of options!!) a few years ago.  I LOVE the fact that it had a ballot box embellishment, as well as the 'I Voted' badge/ribbon, as well as coordinating backgrounds!!

So, think outside the MDS box.  While I absolutely LOVE all of the great downloads that Stampin' Up! offers, you are NOT limited to use JUST those downloads in this program, so if you come across a download from another (*gasp!*) company that you fall in love with, as long as the images are in .png, .jpg & .svg formats, you CAN use them in your MDS program!!  Exciting, isn't it?!

Now, remember, you can always try out My Digital Studio for FREE (for 30 days) by visiting my online store, so why not download it and start creating today?!

Happy Stamping!

Pam

Wednesday, October 15, 2014

October Diva Blog Hop--Halloween

How is it possible that it's already Diva Blog Hop time for the month?!  If you're joining me from Sandy's Blog, I'm the last stop for today (We're a small group this month!).  If you just started here, feel free to head to Sue's Blog and start from there!

Today's theme is 'Halloween'!!  And it just HAPPENS to be my favorite holiday of the year!!

So, to start off, I want to share some Chalkboard art I saw demonstrated at Convention this summer.  For non-Stampin' Up! supplies, you'll need a chalkboard, chalk, a 'pencil' sharpener & aerosol hair spray (Aqua Net was suggested for use, but I was unsuccessful in tracking any down, so just used a different brand--BUT it DOES need to be an aerosol can).  To create the design, I used My Digital Studio (MDS) and created the image I wanted to transfer on to the chalkboard.

Design created using My Digital Studio
Next up, I exported the jpeg then re-inserted it into a new page/photo in MDS and then MIRRORED the image, which I printed out on my home printer through the program.
Mirrored image
I found this next part of the process to be a tad 'putzy', so I HIGHLY recommend for your first project that you pick an image that does not have too much detail, so you don't get frustrated as you work!!  So, now you'll need to sharpen the chalk stick to a sharp point and begin to draw on top of all of the printed lines on the paper.  You'll frequently need to stop and re-sharpen the chalk.  I think I went thru almost two full sticks for this entire project.  For lack of a better explanation, you're basically creating a 'chalk carbon' of the image to use in the next step.

When you get the design fully traced, you'll want to lay it carefully on top of the chalkboard and rub to 'transfer' the image to the chalkboard.  BUT, you're not done yet!!  Now comes the fun part.  To re-draw over the transferred image lines to darken them!!
You can see part of the trace still remaining to be filled in on the word 'Halloween'
And here's the completed image:

Now, obviously chalk on a chalkboard is NOT meant to be permanent, which is where the hair spray comes in.  The hair spray allows the chalk to 'set'.  Either way, it's still not completely permanent--to do that you'd need to use a sealant of some sort.  So if you want to clean off the chalkboard after the holiday and create a new design, you can do so using a little soap and water!
Chalk image with hair spray applied
O.K.  Do NOT freak out when you hit the design with hairspray.  It will 'look' like it's disappeared, but as it dries, the image will re-appear.  I found on mine, however, that some of my images did not stay as dark, so I reapplied some of the chalk and hit it a second time with hair spray, which helped.
Completed design next to mirrored transfer image
AND here it is on display in my living room:


MDS is SUCH a great tool for holiday (Halloween) decorating.  If you check out my Diva Blog Post from last month, there is the great coffin download for Halloween treats, and this week, one of the Weekly Deals is the 'Spooky Treats Designer Template Download'.  I already own it, but for those of you who don't, it's a GREAT deal to check out!
 The kids in your neighborhood will be flocking to your door when they hear about your irresistible Spooky Treats. With this digital-exclusive kit, you’ll have designed candy wrappers, lollipop collars, and a soda wrapper along with additional elements to make coordinating projects. Kit includes a 15-piece stamp brush set, seven Designer Series Paper patterns, four embellishments, one punch, and a three-page 8-1/2" x 11" treat template. Coordinating colors include Basic Black, Lucky Limeade, Pumpkin Pie, and Whisper White.

So, you know I can't talk about MDS without sharing some scrapbook pages, and I happen to have a 'few' that fit today's theme perfectly!!

These first two pages are template pages that came with some of the MDS downloads I did:


And a few more designs I CASEd (copied and 'stole' everything) to highlight some of my adorable great-nephews:

I have a couple other pages I created a few years ago that I'm still waiting for the perfect photos to put into the pages--also ideas that I copied from other talented folks!

I really do NOT spend a lot of time putting photos of me into pages, but I do have a few.  First of all, my best friend Sera and I.  Our mom's made each of our costumes.
And a few different looks of me over the years:

And finally, a couple photos of my college roommates and I on the holiday (over 20 years ago--YIKES!!)!  I created these two pages as a two-page spread.


I hope you've enjoyed our Halloween Diva Blog hop today, and that you have a few ideas to get ready to have a Spook-tacular holiday yourself!!

For quick reference, here are the sites that are hopping today:
Happy Hopping!!

Pam  

Monday, September 15, 2014

September Diva Blog Hop--Holiday Catalog

How is it possible that it's already Diva Blog Hop time for the month?!  If you're joining me from Amy's Blog, I'm the last stop for today.  If you just started here, feel free to head to Sue's Blog and start from the beginning to hop thru all the sites!

Today's theme is the Holiday Catalog.  I LOVE all of the catalogs that Stampin' Up! publishes, and there are SOOOOOO many things that I fell in love with from this one when it was revealed at Convention this past summer!!  Today, though, I'm going to 'mainly' focus on the My Digital Studio Downloads that were featured in it!!

I think it's safe to say that when the Nordic Village Designer Templates were shown up on the screen at Convention, I got a little excited.  As SOON as they became available for me to order, I had them purchased/downloaded and was printing them off.  I did have to adjust a couple little things in order to print the items on my printer at home, but they were super easy to cut out!  I then used Sticky Strip to attach the sides/bottom of each 'house'.  Because they're paper, I'm not going to use 'real' tea lights in them, but will place an LED light in each one when I display them!!


Now, as soon as I got these houses done--I KNEW I needed to create a 'Halloween' version of the village (basically just changed colors, and added, a ghost, bat & cat), and am looking forward to having these out in a couple of weeks:


Moving on to the Halloween Bites Designer Templates, I had a lot of fun making the vampire-wrapped candy bar and coffin, or even just the simple 'bat wrap'.  I added some green neon shredded paper for the vampire to lay in, which was the 'perfect' final touch!!


I LOVE the All Is Calm Party Ensemble--and you can use it to decorate for your Christmas or New Year's parties (or both!).  This ensemble includes a banner, favors (LOVE the crackers--I haven't made them yet, but am looking forward to doing so!!), invitations, thank you notes & more!


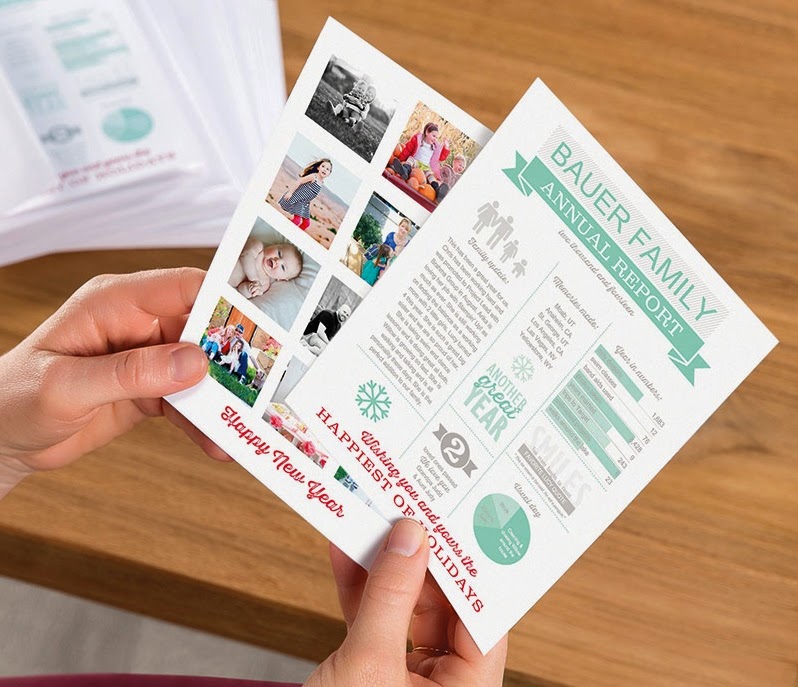
And finally, the Annual Report Postcard Template.  This download is PERFECT for letting everyone know the highlights of your year and a quick/easy double-sided layout to just drop in your photos and add your text!


But wait!!  Those 'might' be the only items that were specifically highlighted in the Holiday Catalog, but there are a few more digital downloads that came out at the beginning of the month that happen to be the digital versions of some of the other items in the Holiday Catalog.  Who doesn't already love the For All Things Stamp Brush set, and the coordinating Color Me Autumn Designer Series Paper?!


The Holiday Home stamp brush set can cover all of your fall/winter holidays (or even new home congratulations!).


And for the Project Life lovers, there is the Holiday Cheer stamp brush set and the Seasonal Snapshot Digital Project Life Cards!

I hope you've enjoyed checking out all of the great posts about the Holiday Catalog that the ladies shared today!!  And for quick reference, here are the sites that are hopping today:
Happy Hopping!!

Pam